June 13, 2021
A tractor by itself—without any implement attached—is just another vehicle that you can drive around your property. To accomplish any given specific task, the tractor needs an implement and attachment. Tractor implements can be either a powered or unpowered machinery. Powered implements derive their power either from the tractor’s power take-off (PTO), hydraulic and electrical output or by wheel action.
How Attachments & Implements Work For Tractor?
Attachments
There are three mounting locations for attaching implements on tractors, namely: front, mid and rear. The most common front-mounted implement is the tractor loader. The loader arms are attached to either of the sides of the tractor’s engine, and their movements are controlled hydraulically. The loader arms are used to raise and lower the implement and allow the mounting of other implements like pallet fork, snow blower, etc., replacing the loader bucket. The loader bucket or any other implement that tilts up and down is also hydraulically-controlled.
The mid-mounting position is the least popular attachment point of the tractor as mounting, and dismounting implement from this position is tiring, if not difficult. The most commonly seen mid-mounted implement is the mower deck.
Attaching implements to the tractor’s rear, on the other hand, is achieved by using a drawbar or a three-point hitch. The three-point hitch is the more popular attachment method used by many tractor users as it allows the implement to be raised and lowered easily.
Implements
Most tractors that are marketed nowadays have one or two implements with varying combinations. There are those equipped with loaders and backhoe implements. There are also those that have loaders up front with mower deck between the front and rear wheels. Depending on the task at hand, the operator can select the appropriate implement to complete the job. There are several types of implements offered on the market today, and they include the following:
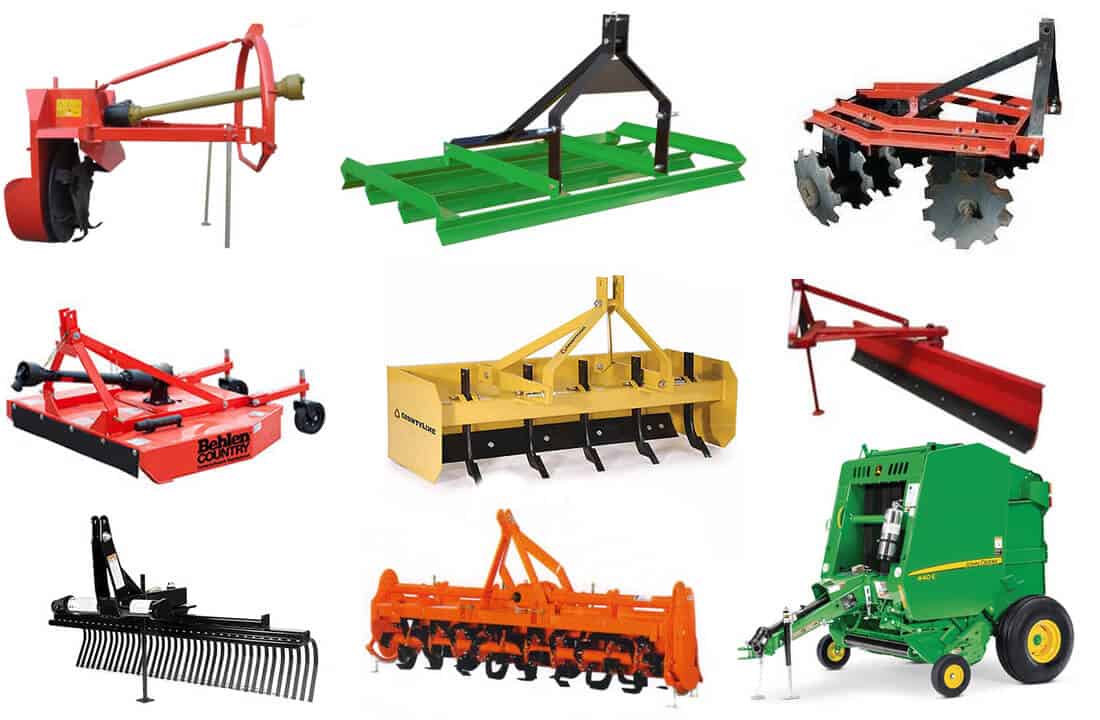
Most Popular Implements & Attachments
1) Front Loader
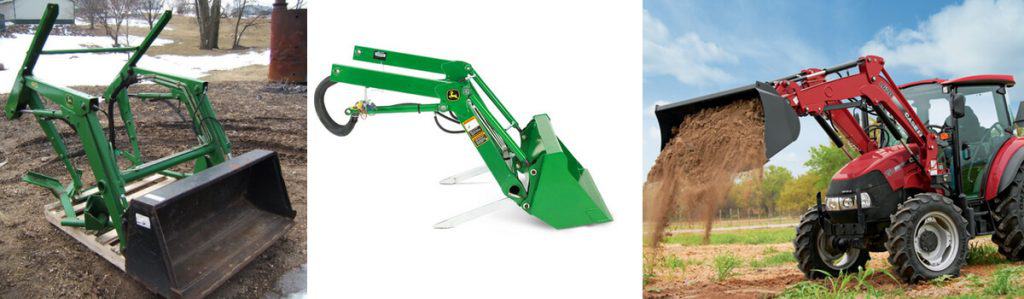
The most commonly attached implement is the loader, as it is often seen on the tractor’s front end alone or in combination with other implements. For most tractor users, the loader is arguably the most important implement for the tractor as it can perform a variety of tasks on a farm or homestead. It can be used to move around the significant amount of materials—that are heavy or disgusting to handle—and other mundane tasks such as transfer of animal manure to compost pits, movement of hay, gravel, fertilizers, etc. The tractor loader can also be used to shovel snow away from the driveway. Instead of the ubiquitous open bucket, the loader arms can also be fitted with other attachments like bale grappler, clamshell bucket, or pallet fork.
2) Pallet Fork / Fork Attachment for Tractor
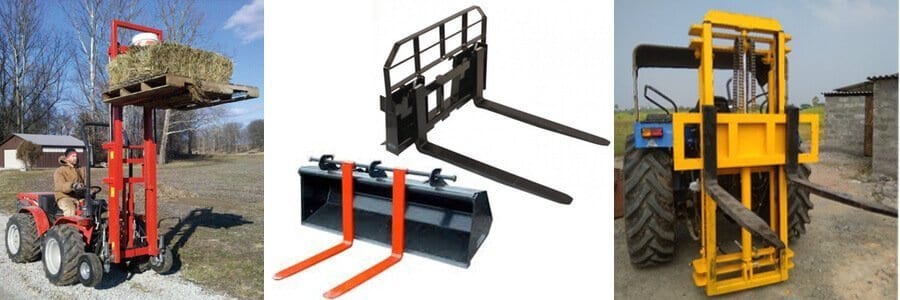
The pallet fork is a versatile farm tool that can be attached to the tractor’s front loader arm. The pallet fork is more suitable in moving cumbersome and oversized loads such as hay bales, boxed farm products, and other pieces of farm equipment. Furthermore, It is been used for industrial purposes as well.
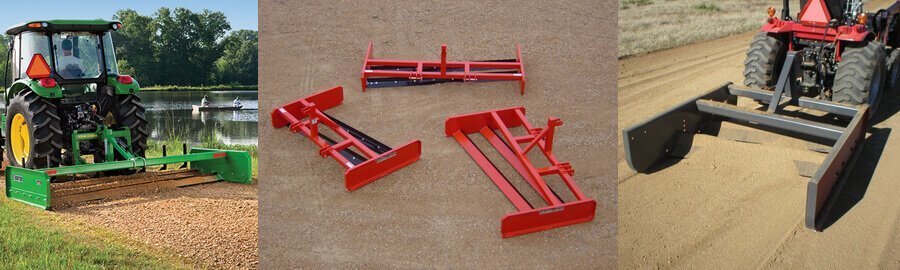
3) The Rear Blade
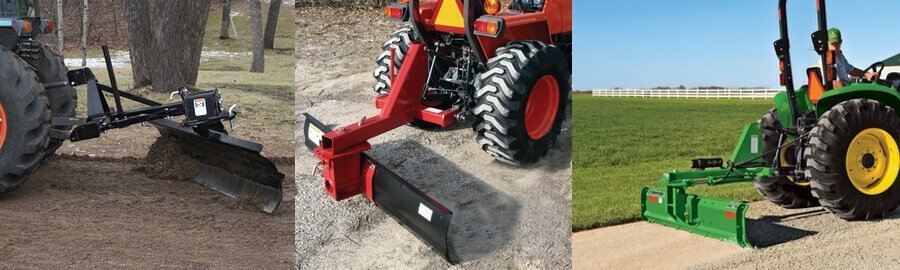
The rear blade is a simple mechanical implement that was designed primarily for leveling and grading the soil, particularly a gravel driveway. In addition to grading and leveling soil, the rear blade is used for spreading and pushing gravel or soil. This implement can be attached to the tractor’s rear through a three-point hitch and can be operated by driving the tractor forward or backward.
In its basic form, the single rear blade is manually adjusted from side to side as well as rotated on its axis or tilted at an angle requiring no power assist. Later models have a hydraulic assist to enable necessary blade adjustments by the operator without leaving his seat. Moreover, some newer model rear blades have back to back blades for forward and/or reverse operation. The rear blade is mainly used in building and maintaining gravel driveways and paths. It can also be used to move snow from the driveway.
4) The Box Blade
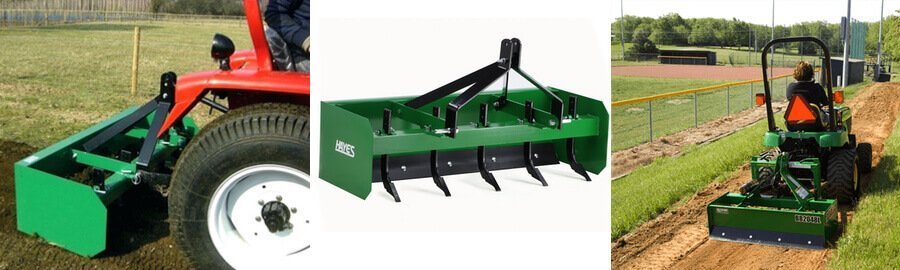
The box blade is said to be a variant of the rear blade as both implements share the same usage and functions. Moreover, both rear and box share the same design layouts and are both manually adjusted in their respective necessary forms. The main differences of the box blade to the rear blade is that the former has an additional row of “scarifiers” in addition to its blade. Moreover, the box blade uses a box framing to hold the scarifiers and the blade in tandem arrangement while the rear blade uses a simpler T-frame to hold its blade. Furthermore, the box blade can be used to perform the function of a rear blade by simply removing the scarifiers, while the rear can’t do the job of a box blade.
Like the rear blade, the box blade is offered in both hydraulically-assisted and manually-adjusted formats and is designed to perform similar tasks as those of the rear blade like grading or leveling gravel driveways or building new paths. Aside from these tasks, the box blade can also be used to level lands for new construction and to create or improve the contours of the land.
5) Land Plane
The landplane is an unpowered implement used to level the ground. This implement has two parallel blades that cut to the ground at a very shallow depth. These blades are set horizontally in tandem with one another at a slightly diagonal angle, for grading or leveling the soil. Some land plane models have added scarifiers for more aggressive ground churning. During operation, when the implement is pulled, the scraped soil is lifted and collected between the two blades. As the soil and other material accumulate, excess material flows over the width of the second blade leaving a trail of flat and smooth surface behind. The landplane can be attached to the tractor via the drawbar or the three-point hitch system.
6) Grooming Mower, Rotary Cutter / Tractor Brush Cutter Attachment
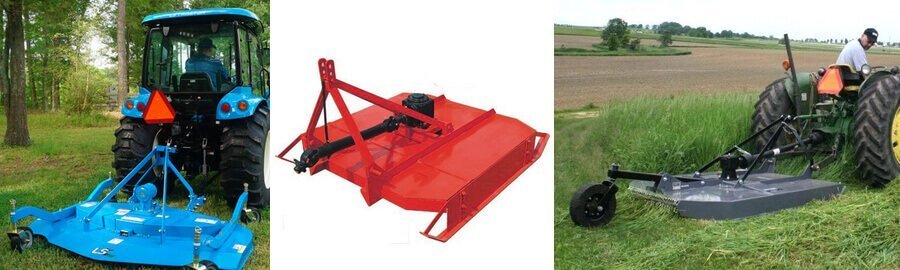
This power take-off or PTO-driven mechanical implement is usually attached to the bottom of the tractor between the front and rear axles or at the tractor’s rear. However, the lawn-mower implement and its more robust variant—the rotary cutter—can also be fitted to the tractor’s rear and/or front end. A grooming mower is an ideal tool for maintaining the growth of turf in your acreage and is efficient in trimming 8-inch grass down an inch tall. On the other hand, the rotary cutter is designed to deal with longer grasses, weeds and even shrubs. Moreover, although the mower and cutter have very similar usage, these two machines are not interchangeable.
7) Snow Blower
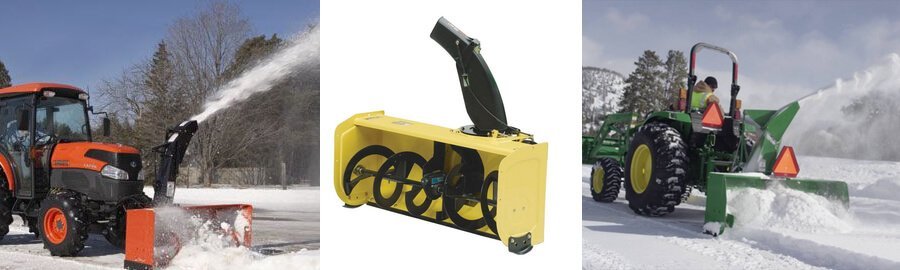
While you can use the front loader to shovel snow away from your driveway, the thickness of the snow limits the front loader’s effectiveness. The snow blower does not suffer this restriction when operating on thick snow. The snow blower is a power-driven implement that uses either the tractor’s power take-off or an integral motor to drive the snow auger that chews on the snow or the impeller that blows the snow away. Most snow blowers are mounted at the rear of the tractor and are powered by the tractor’s PTO unit.
On the other hand, some snow blowers are mounted on the tractor’s front end. This type of implement provides the benefit of driving forward. However, due to its being front-mounted, the implement cannot access the tractor’s PTO linkage and has to be provided with a separate integral power pack to drive the implement.
8) Post Hole Digger
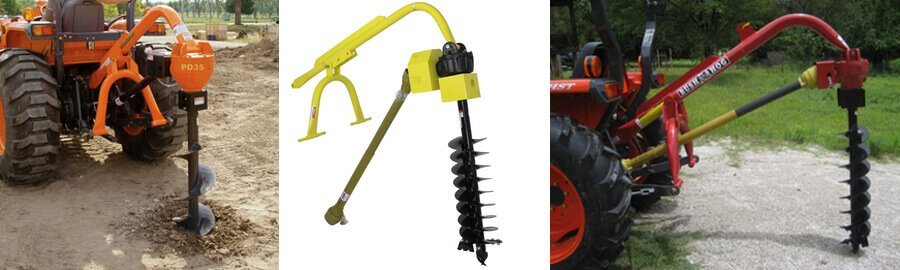
The post hole digger or auger is a PTO-driven implement designed to bore a hole into the ground. This implement is attached at the rear of the tractor using a three-point hitch and is connected to the tractor’s PTO shaft. The auger bit is available in different lengths and diameters.
9) Spreader
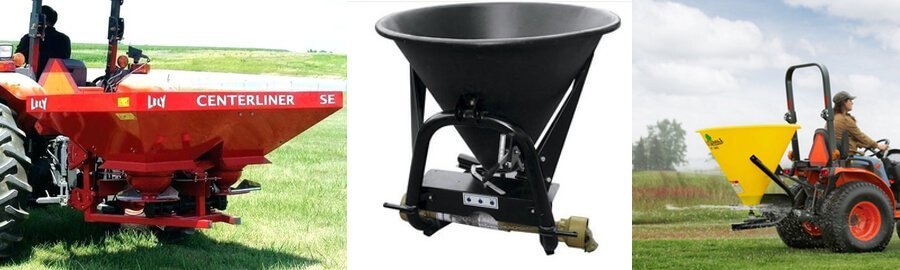
This implement was designed to scatter salt, lime, fertilizer, compost, or wood chips onto the ground. This implement can either be PTO-driven or ground-driven. PTO or power take-off is derived from the tractor via linkage to the PTO shaft. The ground-driven, on the other hand, utilizes a mechanical arrangement that derives its power from wheel movement as soon as the spreader is pulled by the tractor.
10) Rear Loader Bucket
The rear load bucket has a support frame that is joined to a three-point hitch, which is found at the back end of a tractor. Its bucket support frame features two side frames that are centrally joined to the back end of the lower arm links of the hitched coupler. It also features a straight post that a bracket centrally placed on the high end. The front part of the bracket is centrally secured to the back end of the upper arm link of the hitch coupling.
Two hydraulic cylinders are centrally joined to one end of the backend of the bracket, and the other end is are flatly joined to the disposed of the shaft, which can rotate on top of the bucket support frame. The loader bucket is centrally placed on the bucket support frame. It is joined to the rotatable shaft by a link; this causes the increase and draws in of the hydraulic cylinders, which make the bucket to be centrally moved in relation to the frame. The hydraulic cylinders allow the bucket to stay in a leveled condition, roll backward and move to a dump position.
11) Tractor Ballast Weights
There are a series of essential reasons for the use of ballast in tractors. Tractors and their accessories have to put on more weight to be able to house horsepower imbalances. To improve traction and reduce spills, weight needs to be added in the right places. You can increase traction by controlling the ballast and the pressure of tire inflation; it also helps in reducing compaction, maximizing productivity, and maximizing the life span of the tractor’s drivetrain. Adding ballast to a tractor is a great way to ground the power of the tractor.
Increase the weight on the rims is one of the popular methods of tractor weight ballasting by increasing the mass of the wheel. This method is known as ballasting; it involves the adding of weight to the backend tires or tire rims. It helps the tractor to reduce the slipping of backend tires, thereby maximizing the pulling power.
12) Drum Spike Aerator
The drum spike aerator significantly increases the quality of your lawn. The spikes aerate your lawn by making little slits as the drum spike aerator is moved around your lawn. This creates a better soil drainage system and lets the essential nutrients sink into the soil much more quickly. They also create pockets that allow the germination of seeds.
Using spike aeration is quite easy: you drive a spike into a lawn’s soil and make a hole. It most times involves the use of an aerator that has a rotating drum or a wheel enclosed with steel spikes, or you could just use a rake or fork to makes holes in the soil, which also is a form of spike aeration. The most important thing is that the spike only creates holes and does not remove any substance.
Dedicated Farming Implements
Aside from general utility implements, there are dedicated farming implements that are designed to be attached to the tractor. Some of these implements include the following:
1) Plow
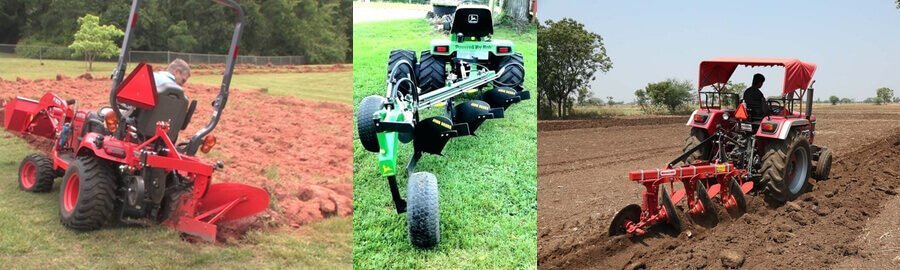
This implement is drawn behind the tractor and is used to prepare the soil for planting by loosening or turning over the soil. Many different plow varieties are currently available on the market. While many plow varieties are PTO-driven, others are simple ground-driven models. Some examples of plow implement include the multi-furrow reversible plow, non-reversible mold-boards, and chisel plow.
2) Harrow
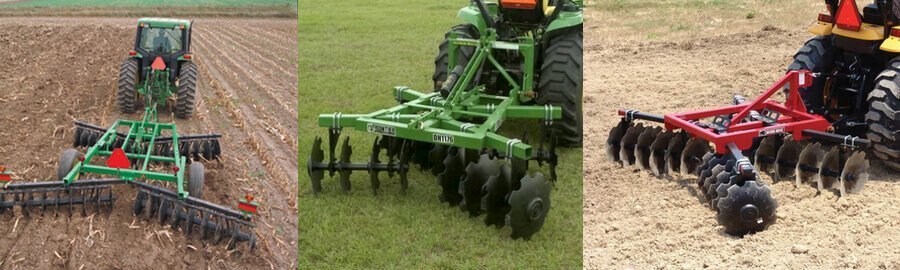
This a tractor implement that is used for shallow tilling, covering the seeds, and killing weeds. It is usually drawn behind the tractor using a drawbar or 3-point hitch. The harrow is either equipped with free-spinning discs attached to a heavy X-shaped steel frame (to ensure that the disc’s path is not parallel to each other) or with a simple rectangular steel frame with flails or chains that is dragged behind the tractor.
3) Planter
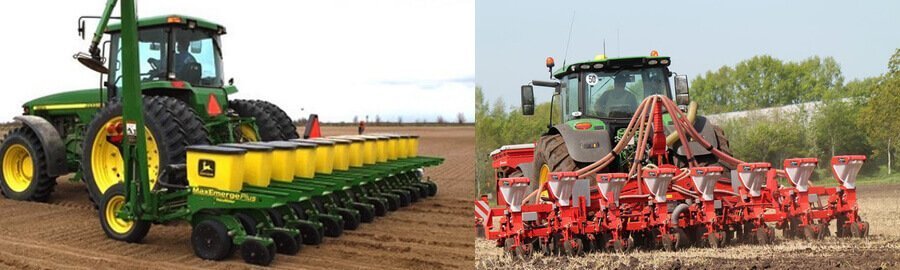
This farming implement is designed to sow seeds and cereals. There is a vast variety of this type of implements. Some are simple construction with two or more seed containers; others have multiple containers with electric and hydraulic drives.
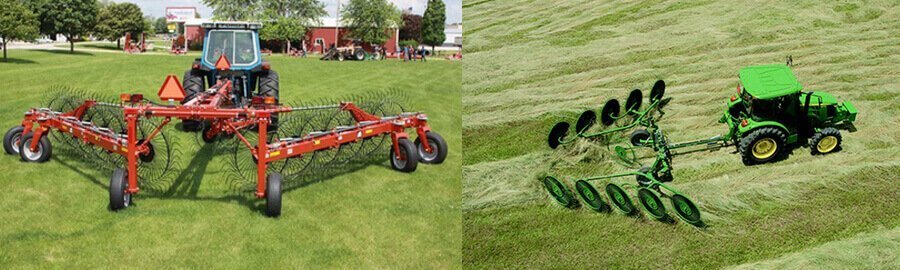
4) Hay Rake / Tractor Rake Attachment
This PTO-driven mechanical implement is used for tedding, spreading, and arranging straws or hay into windrows in preparation to baling. To spread the hay or straws, you can simply remove the hay stop from the implement so that the hay or straw will fly off. Putting the hay stop back collects the straws in a neat line.
5) Hay Baler
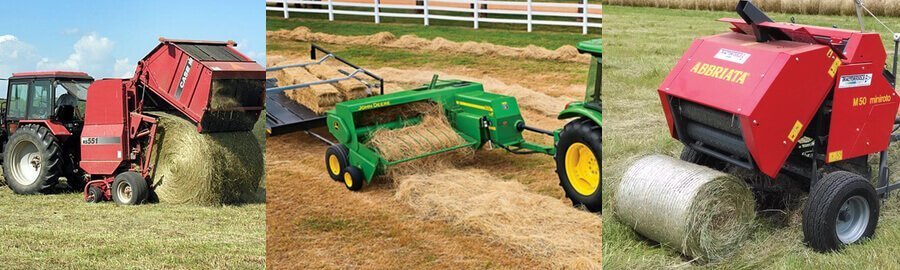
This farming implement is designed to collect and compress hays or straws into bales. Bales can either be cylindrical or rectangular in shape, wherein the hay is arranged and allowed to dry to preserve the hay’s inherent value. This mechanical contraption uses the tractor’s power take off as well.
PTO Wood Chippers
These are made for hard, long-lasting work; they feature a flywheel that grinds wood and also a roller feed, which helps your machine to work effectively and efficiently. Some are also made in a way that they can be attached to your vehicle for easy transport anywhere and can easily be put on a trailer.
PTO wood chippers come in a series of varying chippers and also chipper/shredder combination to pick from. They have much more power than the gas and electric models and efficiently handle any material collected from more prominent properties. They quickly take care of large logs of wood, and they cost just as much as a regular gas model. If you can use a PTO system, then go ahead; they are worth every penny, mainly if you use them for day to day property maintenance.
Conclusion
It is important that the tractor, hitch, and implement have the same category rating. Most, if not all compact tractors, have a category-0 or category-1 rating. These means that the three-point hitch and all implements should be of the same category if you want to ensure that they are compatible with each other.