June 11, 2021
The average DIYers can easily make drilling holes on wood, metal, or masonry even without much skills on that particular task. All they need is an understanding of how the hand drill is operated correctly and which bit to use. Moreover, with the proper tools like a power drill with correct drill bits, anyone can easily bore a hole through any imaginable household material. However, it isn’t the case when it comes to certain strong but fragile materials like glass, tiles, and ceramics. The same is true also when it comes to drilling some hard stones like granite and marble.
Best Methods & Machines For Glass Drilling
There are specific machines and methods that are used in fabrication to bore or cut oversized holes on glass, mirrors, and tiles. The most popular industrial method is by using a highly specialized press drill with two bits working on the opposite sides of the workpiece to be perforated. For cutting more complicated shapes or thick surfaces such as glass, marble, and granite, a computer-aided waterjet cutter is the tool of choice for it cuts fast, accurate, and clean on any material including steel.
However, not everybody can get hold of these pieces of equipment, especially, of the waterjet cutter that uses a certain type of abrasives mixed with the highly pressurized jet of water. So, DIYers must content themselves with the most readily available tool—the variable speed electric hand drill. These hand drills are the most commonly used power tools. Some hand drill designs come with a press drill mechanism. Press drill is well suited for glass drilling for it is more stable during operation.
There are also purpose-designed portable glass-drilling machines for the commercial application that are currently available on the market. These press drills are more robust and expensive than the hand drills and come with a water supply attachment that goes to the spindle. The water passes the spindle into the cylindrical diamond-tipped drill bit, then to the workpiece to prevent overheating during the drilling process.
Important Things to Know Before Drilling Glass
If you are a tyro in working with glass, there are some important factors that you need to know before working on its surface. These factors include the following:
- First and foremost, you should determine the glass type of your workpiece. Not all glass can be worked with. You can drill holes on glass, mirrors, bottles, drinking glass, but not on tempered or safety glass. You can drill a hole on an ordinary glass before the tempering process, but not the other way around. Tempered glass readily shatters into minute granules once its surface is penetrated.
- Use special carbide or diamond drill bits when drilling on the glass. The carbide bit for drilling glass is characterized by its spear-shaped tip. Diamond drill bits are mostly cylindrical with a hollow center that runs from tip to shank. Due to proprietary issues, there are many types of shanks or connections that are commercially available. There are bits with thread that need to be screwed to the drill. You should find a bit with a suitable shank that would fit your drill chuck.
- When working with glass, whether you are cutting, polishing, or drilling, you need to have much patience. Work slowly and carefully, but also work surely for glass is a very fragile material. For added safety, you should work in a secluded area like in the basement or garage of your house. In this way, you can work safely, away from your kids, and thus, avoiding accidents.
- When working with glass, safety is of paramount importance. You should ensure that your working area is safe. Secure the stability of your work table and wear protective gears like safety glasses, cut-resistant gloves, and safety shoes. Never wear loose-fitting garments that may get between you and the machine while you drill. Moreover, you should protect your arms by wearing a long-sleeved shirt.
Aside from the basic knowledge about glass, if you are a DIYer, you need to have a variable speed electric hand drill and a set of carbide drill bits that are specifically designed for boring through glass and mirrors. Furthermore, you must learn and practice the proper techniques and procedures on how to drill glass.
Steps On How to Drill Hole in Glass With Power Drill
If you want to engage in glass drilling, you should know the following steps on how to safely drill on a glass, and these steps are the following:
1) Choose the Proper Drill Bit
There is a wide variety of drill bits at hand, and each type is designed for the boring specific type of materials. When drilling glass, mirror, or ceramic tile, a carbide drill bit is required. This bit type is readily identifiable by its spear-shaped tip. DIYers commonly use this bit.
The second type of bit that is used for drilling glass is the diamond-encrusted tip. This bit comes in different profiles such as those with spearheads (like those of carbide tips), cylindrical tips, and the common twist drill bits. Despite being dissimilar in appearance, these drill bits are characterized by the rough textures of their tips due to the diamond encrusting on its surface. The cylindrical bits, however, are designed with a threaded shank to fit into the spindle of the glass drilling machine. And they can’t be used with the more common hand drill.
2) Glass Preparation
Before getting a drill, it is important to prepare your glass workpiece. In preparing your workpiece, you need to identify and mark the exact location of the holes. First, clean the surface of the glass where you would need to tape the area where the hole would be bored. The tape is a safety precaution that would hold the glass pieces in place in case of breakage. The adhesive on the tape would prevent small glass pieces from flying off and hold the small pieces in place and prevent the glass from scattering.
You can also add tape on the reverse surface of the glass to hold any chipped glass in place. Moreover, with the tape in place, you can easily mark the exact location of the hole on the glass with a pencil or pen which is quite difficult to do if you would mark the glass directly. Furthermore, the tape prevents the drill bit from slipping when the drilling begins.
3) Drilling
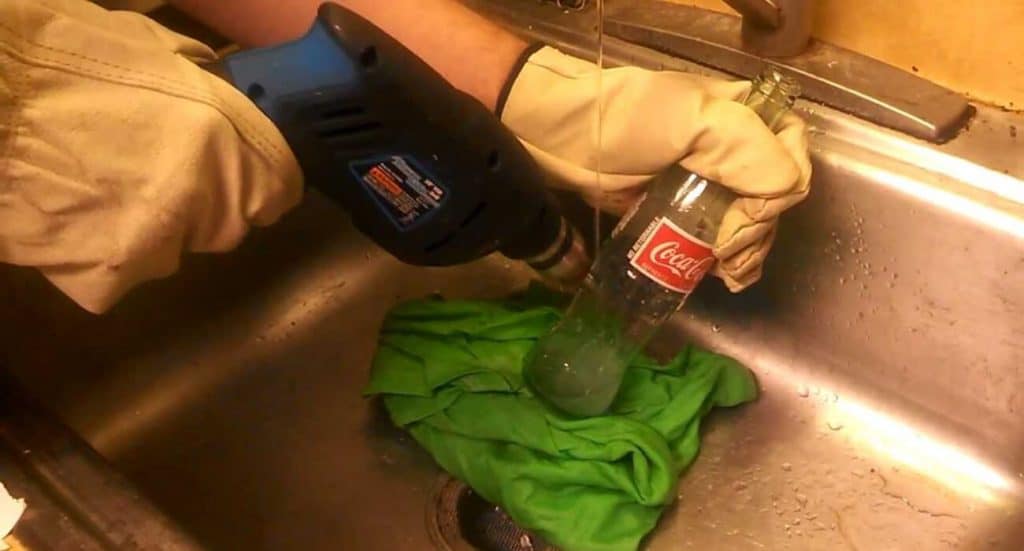
There are several methods employed when drilling glass. One method requires the lubrication of the glass surface to be drilled, while another technique involves the use of a special coolant or oil. Most industrial glass-drilling methods and machines do not require any lubes, and the only coolant with which they are used is water. All portable and large industrial type glass-drilling machines are designed with hose attachments for a water source. Water keeps the drill bit and the glass surface from overheating and breaking the workpiece.
- When using a hand drill, it is necessary to check the settings of the power tool before starting. Set the drill into its lowest speed in forwarding setting and adjust the drill setting to drill mode. This is important to keep the hand drill in a very steady position from the onset until the glass is perforated. Place the workpiece on a stable platform to support the workpiece on its back and hold the drill where the bit is perpendicular (90° angle) to the workpiece surface.
- Newbies in glass drilling need to make an initial hole using a smaller bit. After drilling the initial hole, they can continue drilling using a bit with the required diameter using the initial hole as a guide. More experienced DIYers and craftsmen generally skip the initial boring stage and go on drilling on the workpiece using the required diameter drill bit.
- While drilling, a constant amount of water should be present over the area that is drilled to prevent the bit or workpiece from overheating. Do not hurry yourself while drilling. Put a mild pressure on the drill from time to time and ease the drill between intervals until the workpiece is perforated. When drilling bottles, ensure that the workpiece is stable and doesn’t move during drilling.
- Never drill too close to the edge of the workpiece. Glass strength is severely weakened once the material is perforated. Drill at least 20 mm (0.79 inches) from the nearest edge of the glass.
4) Cleaning
Upon the completion of the drilling process, you need to pass a steel file or rolled wet and dry 600-grit sandpaper to the hole to remove certain sharpness left by the drilling procedure. Then, you can peel away the adhesive tape that you’ve placed on the glass. Clean the remaining adhesive with mineral spirit or glass cleaner.
Conclusion
Drilling holes on glass and mirror, especially, on bottle using an electric hand drill can be tricky; therefore, you need constant practice to perfect it. Moreover, you can develop your own technique in drilling glass with constant practice and turn this glass drilling into a work of art. However, you should first be cognizant of the abovementioned tips and factors. The tips and factors mentioned above will undoubtedly facilitate the glass drilling process for you, and at the same time, help you avoid the usual pitfalls encountered by newbies when first drilling on a glass.